Design Applications
The most interesting designs combine order and variety. Brain waves are stimulated by the combination of both order and variety in that they flatten with too much order (boring) or too much variety (confusion).
Order is provided through use of a design template (Orthogon). Elements within the design will relate to each other and to the design as a whole. The artist provides variety with all the other elements and principles of design (shape, color, pattern, etc.). A maple leaf will look like a maple leaf but no two out of thousands of leaves will be shaped and colored exactly the same. Only one Orthogon, the Auron, appears in a staggering array of plants and animals.
Once an Orthogon is formed, several relationships automatically are available to use:
· the square
· the section extending beyond (or within) the square
· the new rectangle (Orthogon).
This rarely offers enough distances (proportions) to work with, however. Several additional distances are usually needed to complete a design: small, medium, large (even tiny). To determine those additional spaces, follow the instructions below:
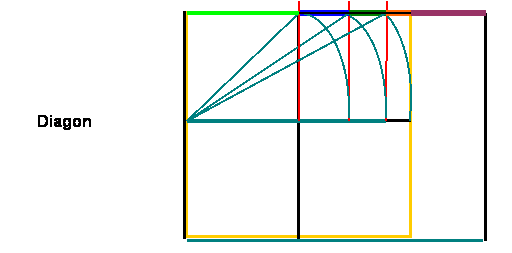
1. Divide the square into quarters (this is not necessary but serves to contain the measuring process).
2. Starting in the top quarter, measure from the bottom left corner diagonally up to the top right corner (of that same quarter. This process is similar to finding root 2, root 3, root 4, etc.
3. Lay that measurement down and mark where it falls.
4. Mark that distance on the top line.
5. Measure from the same corner you started the previous measurement. Lay down that measurement and mark where it falls.
6. Mark that distance on the line straight above.
7. If another measurement is completed, it should end up at the edge of the square (continuing out beyond the square will create several more spaces).
8. Also mark the halfway point of the square.
This process creates additional proportions that can be applied in any direction for a variety of arrangements within a work.
To begin a design, mark the distances created as described above on the edge of a piece of paper or wooden stick to form a new "ruler".
Determine the overall size for the work and cut or mask if two-dimensional. (Three-dimensional works will require methods for determining proportions that are specific to the medium.)
Place marks on the edges of the work using the new "ruler". Additional marks can be placed within the work as desired.
A good starting place is to mark the square and the halfway point of the square (light green line in above illustration). Continue marking distances using the "ruler" as desired. I typically divide a work into quarters and emphasize the top left and bottom right quarters after the Dutch Masters' apparent references to "Heaven" and "Home" (direction of light, placement of figures, etc.).
All this measuring may seem tedious at first, but once the marks are set, placing elements within the work becomes more like a card game and less of a trial. Simply place the various elements of the design to align with the marks made using the new "ruler".
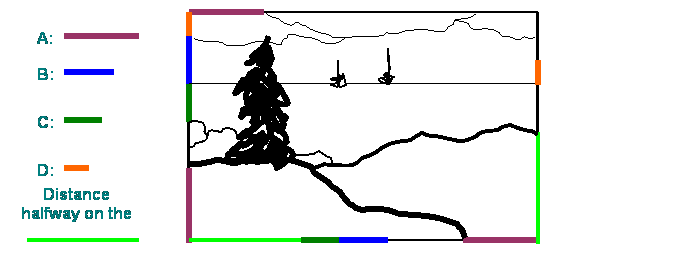
Analyze the simplified design below to determine how
shapes and lines intersect at the measurement points
A is repeated at least three times, B twice, C twice, D twice and the halfway point twice. (Measurements are approximations.)
Giorgio Morandi's art, especially his Natura morta or still life paintings, reveal a masterful use of 3 or 4 measurements in a variety of directions. Joseph Mallord William Turner's calm seascapes and Edgar Degas' paintings of horses are similarly interesting to analyze for use of inter-related elements. Start by looking for the square. (Caution: works may be cropped in the process of publication, which can alter some of the measurements but the concept will still be apparent.)
Arcs and diagonals can be directed to various "ruler" marks for emphasis--particularly the square. The more complicated Orthogons (scheduled for availability in pamphlet form) provide arcs and diagonals that appear in the process of creating the Orthogons.
An example of how an Orthogon is used in 2-dimensions is found in one of my works titled, “Joan’s Offering”, an etching and monoprint 13”X 10” (used in lieu of works by the Masters pending copyright). As stated above, “Begin with the square,” and find the square in several directions (measurements are approximations). Additional space divisions reappear within the work (small, medium, even tiny).

Use of any design system does not guarantee quality.
About Orthogons Orthogon Instructions Design Application Historical Use References Links Artist